
Water heaters have become a modern-day necessity, providing hot water for various purposes at the twist of a tap. However, for these heaters to work optimally, they require a properly wired connection. Every element, including the wires, pipe connections, and circuit breakers, plays a crucial role in the smooth operation of a water heater.
Proper wiring ensures the efficiency and longevity of your water heater. It also safeguards against possible electrical hazards, which can cause damage to the heater, and in extreme cases, can even lead to a fire outbreak. Therefore, correct installation following a detailed wiring diagram is paramount.
The crux of water heater installation lies in understanding the wiring diagram. This diagram serves as a roadmap, guiding each step of the installation process. From pipe connections to circuit breakers and safety measures, everything is determined by the wiring diagram.
Contents
A Glimpse at Water Heater Basics
Brief on Types of Water Heaters
Water heaters can be broadly categorized into two types: tankless and storage tank water heaters. While the former instantly heats water as it flows through the unit, the latter stores and continuously heats a large volume of water.
Main Parts of a Water Heater
The major components of a water heater include a cold water supply pipe, hot water outlet pipe, drain valve, thermostat, heating elements, and an anode rod. Each of these plays a unique role in the overall functioning of the heater.
Water Heater Wiring Requirements
Wire Types and Their Importance
The wires used in the installation of water heaters are generally either 12-gauge or 10-gauge wires. Choosing the right wire type is crucial for ensuring the safe and efficient operation of the heater.
The Role of Circuit Breakers
Circuit breakers safeguard your water heater from possible electrical overloads or short circuits. They automatically interrupt the electrical flow when they detect a fault, thus preventing potential damage or fire hazards.
Safety Measures to Remember
Safety should be your top priority when installing a water heater. Always ensure to turn off the power supply before starting the installation process, and use insulated tools to avoid electrical shocks.

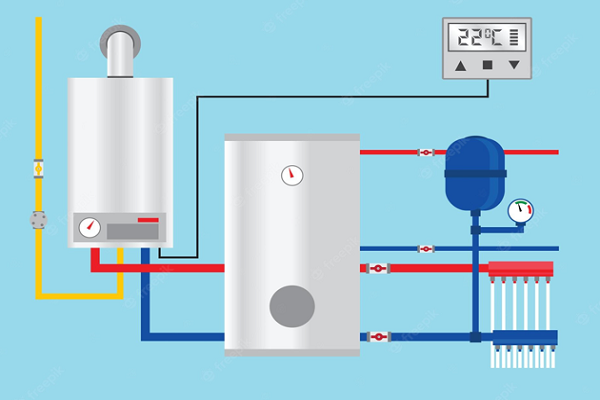
Water Heater Pipe Connection Diagram
Diagram Explanation
A water heater pipe connection diagram is essentially a visual guide that illustrates how the pipes should be correctly connected to your water heater. Whether you’re dealing with a gas or electric water heater, the diagram will clearly show the cold water inlet pipe and the hot water outlet pipe.
For gas water heaters, it will also include the gas supply line and venting system, essential for safety and proper functioning. Another critical component shown in the diagram is the temperature and pressure relief valve. This component serves as a safety feature to prevent excessive pressure build-up in the water heater.
Interpreting the diagram correctly is crucial for successful installation. Incorrect interpretation can lead to a faulty connection, reducing the efficiency of your water heater, or even causing severe damage.
Importance of Accurate Pipe Connection
The water heater relies on accurate pipe connections for optimal performance. Any inaccuracies can lead to water leaks, pressure issues, reduced efficiency, and possible damage to the heater.
Hot water is produced when cold water enters the heater through the cold water inlet, gets heated by the heating element or gas burner, and exits through the hot water outlet. Therefore, if these pipes are not accurately connected as per the diagram, the whole process can be disrupted, resulting in no hot water production.
Also, if the temperature and pressure relief valve are not correctly connected, it may lead to dangerous pressure build-up inside the heater. Therefore, following the pipe connection diagram accurately is crucial for safety and efficient performance of the water heater.
Step by Step Guide to Water Heater Wiring
Tools You Will Need
Wiring a water heater is a technical task, and having the right tools can make the process smoother and safer. Here’s a list of essential tools you’ll need:
- Screwdriver: This will be needed for opening the junction box and securing the wires.
- Wire cutter: Useful for cutting the wires to the right length.
- Wire stripper: This will help to strip off the insulation from the wire ends before connecting them.
- Electrical tape: Used to insulate the wire connections and prevent short circuits.
- Voltage tester: It’s a handy tool to ensure that the power is off before starting the installation process.
Pre-installation Checklist
Before beginning the installation process, here are some things you should check:
- Ensure you have all the required tools and materials. It’s frustrating to stop in the middle of the installation because you’re missing a necessary tool.
- Turn off the power supply to the water heater. You can do this at the circuit breaker in your home. It’s crucial to avoid any risk of electric shock during the installation.
- Understand the wiring diagram thoroughly. You need to know exactly where each wire goes. It’s a good idea to keep the diagram near you during the installation for quick reference.

Installation Process Explained
Preliminary Steps
- Begin the process by ensuring that the power supply to your water heater is turned off. You can use a voltage tester to confirm this.
- If you’re replacing an old heater, you’ll need to drain it before disconnecting the wires. To do this, connect a hose to the drain valve and direct it to a suitable drainage point. Open the drain valve to let the water out.
Wiring Process
- Start by opening the junction box on the water heater using a screwdriver. This box houses the wires and is typically located at the bottom of the heater.
- Locate the wires inside the junction box. There should be three: a black (hot) wire, a white (neutral) wire, and a green or bare (ground) wire.
- Now, take the corresponding wires from your home’s electrical supply – they will connect to the wires in the junction box. Use a wire cutter to cut them to the right length if necessary.
- Strip off about half an inch of insulation from the ends of the supply wires using a wire stripper. Then connect the supply wires to the wires in the junction box – black to black, white to white, and ground to ground.
- Once the wires are connected, secure each connection with a wire nut. Then wrap each connection with electrical tape for added safety.
- After all connections are made, replace the junction box cover and restore the power supply. Be sure to double-check all your connections before turning the power back on.
Post-installation Checks
Once you’ve completed the installation, it’s time to perform a series of checks to ensure everything is functioning as it should:
- Check for leaks: Turn on the water supply and check all connections for leaks. If you find any, turn off the water supply and tighten the connections.
- Check the temperature: Turn on a hot water tap and let it run for a few minutes. Then check the temperature of the water. If it’s not hot enough, you may need to adjust the thermostat on the water heater.
- Listen for unusual noises: Strange noises like banging, popping, or hissing could indicate a problem. If you hear anything unusual, it’s best to call a professional.
- Check the pressure relief valve: This valve should open to relieve pressure if it gets too high. To test it, simply lift the valve handle and let it snap back. You should hear a gurgling sound as some water is released into the drain tube. If you don’t, the valve may be faulty and should be replaced.
Water Heater Maintenance Tips
Maintaining your water heater regularly can enhance its performance, efficiency, and lifespan. Here are some tips:
- Check the thermostat settings: The thermostat controls the temperature of the water. If set too high, it can lead to unnecessarily hot water and increased energy bills. A setting of 120-140°F is typically sufficient for most homes.
- Inspect for rust and leaks: Regularly inspect your water heater for signs of rust and leaks. Even small leaks can lead to significant water damage over time.
- Flush your water heater: Over time, sediment can build up at the bottom of the tank, reducing the efficiency of the heater. Flushing the heater once a year can help remove this sediment.
- Inspect the anode rod: The anode rod protects the tank from rusting. Over time, it can corrode. Checking it every couple of years and replacing it when necessary can prevent damage to the tank.
- Insulate the tank: Insulating your water heater can reduce heat loss and save on energy bills. You can use a water heater blanket for this purpose.
- Regular professional check-ups: Even with regular maintenance, it’s good to have a professional inspect your water heater every few years to ensure it’s in optimal condition. They can spot potential problems early and provide necessary repairs or replacements.
Frequently Asked Questions
What type of wire is used for water heaters?
Generally, 12-gauge or 10-gauge wires are used for water heaters. The choice of wire depends on the specific requirements of the heater.
Why is a circuit breaker necessary for a water heater?
A circuit breaker is an essential safety feature for a water heater. It protects the heater from electrical overloads and short circuits by automatically interrupting the electrical flow when it detects a fault.
How often should a water heater be serviced?
A water heater should ideally be serviced once a year to ensure its efficient operation. However, if you notice any issues like reduced hot water supply or unusual noises, you should seek professional help immediately.
Conclusion
Correct wiring of a water heater, based on a detailed wiring diagram, ensures its safe and efficient operation. From selecting the right type of wires to accurate pipe connections and the use of circuit breakers, every element plays a crucial role in the process.
Maintenance plays a key role in the performance and lifespan of a water heater. Regular checks and servicing can help identify potential issues early and keep your heater running efficiently for longer.
Ultimately, if you are not confident or experienced in handling electrical installations, it’s best to seek professional assistance. While the process can be done DIY, having an expert take care of it can provide peace of mind, ensuring that the installation is done safely and correctly.